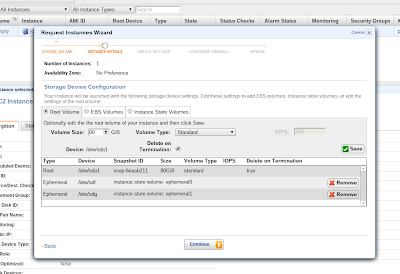
Today I was playing with EC2, trying to launch a RHEL 6.3 instance so that I could then install the latest version of Katello and beat a bit on it… just for fun, you know? Using the EC2 Management Console web interface I used the “classical” wizard to select all the components I wanted for a m1.large instance, making sure to edit the default 7.5 GB root partition they give you so that I could have more space available to synchronize content… but when the instance finally came up I realized that my disk space was still showing the default value:
[root@ip-aa-bb-cc-dd ~]# df -h
Filesystem Size Used Avail Use% Mounted on
/dev/xvde1 5.7G 1.7G 4.0G 30% /
none 3.7G 0 3.7G 0% /dev/shm
I wrecked my brain about that for quite some time, retracing my steps and even terminating my instance and starting from scratch a few times, thinking that perhaps I had missed an obvious step. Eventually I came across a few posts online and was able to solve my problem, which I will try to describe below. Obviously, feel free to read the original posts for more information. The steps are as follows:
- Once your instance is up and running, stop it selecting the Stop option from the Management Console window.
- Now, switch to the Elastic Block Store section and select your instance’s volume from the Volumes subsection.
- Detach the selected volume.
- Select the option to create a snapshot off of the detached volume.
- Switch to the Snapshot subsection and select the newly created snapshot.
- Select the Create Volume option and create a larger volume.
- Go back to the Volumes subsction, select the newly create volume and attach it as the root volume for your instance (should be /dev/sda1).
- Restart your instance.
As soon as the instance is back online, ssh to it and verify that the disk size has not changed:
Now, resize the root partition so that it can “absorb” the larger volume we created:
[root@ip-aa-bb-cc-dd ~]# resize2fs /dev/xvde1
resize2fs 1.41.12 (17-May-2010)
Filesystem at /dev/xvde1 is mounted on /; on-line resizing required
old desc_blocks = 1, new_desc_blocks = 5
Performing an on-line resize of /dev/xvde1 to 20971520 (4k) blocks.
The filesystem on /dev/xvde1 is now 20971520 blocks long.
If everything goes well you should now see a much larger disk available (a 80GB volume in my case):
[root@ip-aa-bb-cc-dd ~]# df -h
Filesystem Size Used Avail Use% Mounted on
/dev/xvde1 79G 1.7G 77G 3% /
none 3.7G 0 3.7G 0% /dev/shm
The following posts were helpful to me:
- https://forums.aws.amazon.com/thread.jspa?messageID=309754񋧺
- http://alestic.com/2010/02/ec2-resize-running-ebs-root
PS: After writing this I wonder if I’m expected to run resize2fs after editing the root partition during the wizard process and starting the instance… will try that next time.